So you decided to create a new application that will look stunning and make life easier for the users. Good for you. We’re here to help ;)
You can always download the skeleton from here
When you extract the skeleton you should see the following solution:
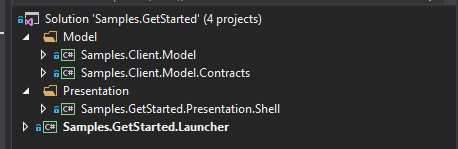
Launcher
The entry point for your app is the Launcher project. It contains the bootstrapper
with the minimum configuration logic and allows us to specify the app’s root object:
public sealed class AppBootstrapper : BootstrapperContainerBase<ExtendedSimpleContainerAdapter>
        .WithRootObject<ShellViewModel>
    {
        public AppBootstrapper()
            : base(new ExtendedSimpleContainerAdapter())
        {
        }
    }
This bootstrapper extends the existing bootstrapper of the excellent framework Caliburn.Micro. We omit here its implementation for brevity but you’re more than welcome to get familiar with this amazing tool.
The ExtendedSimpleContainerAdapter allows us to specify the kind of inversion-of-control
container we want to use in our app for dependency injection. If you don’t use dependency injection at all
(though you should ;) or already familiar with another container, don’t worry. You can always replace the container here
and all non-container specific logic won’t change at all!
The ShellViewModel is the root view model of the application we’re about to write. Here we use the View-Model first approach
of the MVVM UI pattern and therefore we have to specify the first view-model to be displayed.
Presentation
The view and view-model parts of the app reside in the Presentation solution folder. We can see
two folders in the skeleton which host views and view-models respectively. We can also see the naming convention here:
FeatureViewModel <-> FeatureView. This allows the underlying framework to locate the views without any additional configuration!
The root view model of any app is typically called ShellViewModel and serves as the container for any future components.
Model
The main philosophy behind the framework is that the Model layer is the central part of any client app. It serves as a single source of truth
and allows any part of the app to access its state and change it according to the user actions/server updates, etc. It is available to any component
via dependency injection through the defined interfaces. In the begininning there’s only one such interface: IDataService but many will follow. It’s important to stress
the fact that the Model services are exposed to the View-Model layer by interfaces only. This is done to eliminate dependency on the actual model
implementation and even allow it to be substituted for testing/demo purposes.
Hence there are two projects in the Model layer: Model.Contracts and Model
There are two main kinds of objects in this layer: Services which you already saw and Entities which model specific entities, like users, bills, comments, etc. Let’s have a closer look at the model in the skeleton:
public interface IAppModel : IModel<Guid>, IEditableModel
{
}
internal abstract class AppModel : EditableModel<Guid>, IAppModel
{
}
Every model which represents a unique entity in the Model layer must have a unique identifier.
We can specify the type of the identifier in the definition of the model and supply the value later.
Unless there are some specific requirements/constraints we recommend using System.Guid for these purposes.
There’s another class that actually registers the IDataService and its implementation DataService
such that it’s resolved correctly in the runtime. It will be explained later.
The framework classes contain all property notification boilerplate logic so we can concentrate on implementing the actuall app’s needs.
Editing item
Up to now the app doesn’t really do much. So we would like to add some basic functionality and we will start with editing an entity. The first part of it should be defined in the Model layer.
First of all let’s define the contract of the new entity and its basic implementation
public interface IWarehouseItem : IAppModel
{
    string Kind { get; }
    double Price { get; set; }
    int Quantity { get; set; }
    double TotalCost { get; }
}

internal sealed class WarehouseItem : AppModel, IWarehouseItem
{
    public WarehouseItem(
            string kind,
            double price,
            int quantity)
    {
        Id = Guid.NewGuid();
        _kind = kind;
        _price = price;
        _quantity = quantity;
    }

    private string _kind;
    public string Kind
    {
        get => _kind;
        set => SetProperty(ref _kind, value);
    }

    private double _price;
    public double Price
    {
        get => _price;
        set
        {
            SetProperty(ref _price, value);
            NotifyOfPropertyChange(() => TotalCost);
        }
    }

    private int _quantity;
    public int Quantity
    {
        get => _quantity;
        set
        {
            SetProperty(ref _quantity, value);
            NotifyOfPropertyChange(() => TotalCost);
        }
    }

    public double TotalCost => _quantity * _price;
}
Let’s have a look of what we have here. the IWarehouseItem is merely a contract which describes the data the entity should hold and the
level of access for the external consumers. It shouldn’t contain any implementation logic and is therefore modeled as an interface.
The WarehouseItem on the other hand contains the actual logic of setting the value and raising the proper notification event.
This is achieved via the SetProperty method.
The ShellViewModel should consume the models and dispatch command via the appropriate services. In our case there’s only one such service IDataService.
So let’s expose the entity via the interface and some fake implementation:
public interface IDataService
{
    IWarehouseItem SingleItem { get; }
}

internal sealed class DataService : NotifyPropertyChangedBase<DataService>, IDataService
{
    public IWarehouseItem SingleItem { get; } = new WarehouseItem("PC", 25.43, 8);
}
Editing options
Remember that we want to be able to edit the entity. That’s why the AppModel inherits from EditableModel.
Moreover we would like to be able to save and cancel the changes as well as undo/redo the whole history stack (time-travel).
This will require a slight modification in the base model:
public interface IAppModel : IModel<Guid>, IEditableModel, IUndoRedo
{
}

internal abstract class AppModel : EditableModel<Guid>.WithUndoRedo, IAppModel
{
}
Pay attention to the UndoRedo inclusion. That’s part of the LogoFX framework, too!
Editing item - presentation part
With that in place we’re ready to upgrade the ShellViewModel and ShellView to
allow editing the entity. The LogoFX framework contains a view model for this scenario:
public class ShellViewModel : EditableObjectViewModel<IWarehouseItem>
{
    public ShellViewModel(IDataService dataService)
        :base(dataService.SingleItem)
    {

    }

    protected override async Task<bool> SaveMethod(IWarehouseItem model)
    {
        //TODO: Add custom saving logic - handle exceptions, etc.
        await Task.Delay(50);
        return true;
    }

   private ICommand _undoCommand;
   public ICommand UndoCommand => _undoCommand ?? (_undoCommand = ActionCommand.When(() => Model.CanUndo).Do(() => Model.Undo()).RequeryOnPropertyChanged(this, () => Model.CanUndo));

   private ICommand _redoCommand;
   public ICommand RedoCommand => _redoCommand ?? (_redoCommand = ActionCommand.When(() => Model.CanRedo).Do(() => Model.Redo()).RequeryOnPropertyChanged(this, () => Model.CanRedo));
}
This requires adding two packages: LogoFX.Client.Mvvm.Commanding.Core and LogoFX.Client.Mvvm.ViewModel.Extensions.Core to the Presentation.Shell project
and one package: LogoFX.Client.Mvvm.Commanding to the Launcher project and updating the bootstrapper initial setup:
partial class App
{
    public App()
    {
        var bootstrapper = new AppBootstrapper();
        bootstrapper
            .UseResolver()
            .UseCommanding()
            .Initialize();
    }
}
As you can see the amount of code needed to be added to implement this common scenario is quite small.
<Window x:Class="Samples.GetStarted.Presentation.Shell.Views.ShellView"
        xmlns="http://schemas.microsoft.com/winfx/2006/xaml/presentation"
        xmlns:x="http://schemas.microsoft.com/winfx/2006/xaml"
        xmlns:mc="http://schemas.openxmlformats.org/markup-compatibility/2006"
        xmlns:d="http://schemas.microsoft.com/expression/blend/2008"
        xmlns:viewModels="clr-namespace:Samples.GetStarted.Presentation.Shell.ViewModels"
        mc:Ignorable="d"
        d:DataContext="{d:DesignInstance viewModels:ShellViewModel}"
        Height="350" Width="500"
        d:DesignHeight="300" d:DesignWidth="300">
    <Grid>
        <Grid.RowDefinitions>
            <RowDefinition Height="Auto"/>
            <RowDefinition Height="20"/>
            <RowDefinition Height="Auto" />
        </Grid.RowDefinitions>
        <Grid.ColumnDefinitions>
            <ColumnDefinition Width="Auto" />
            <ColumnDefinition Width="*" />
        </Grid.ColumnDefinitions>
        <Grid Grid.Row="0" Grid.Column="0">
            <Grid.RowDefinitions>
                <RowDefinition Height="32" />
                <RowDefinition Height="32" />
                <RowDefinition Height="32" />
                <RowDefinition Height="32" />
                <RowDefinition Height="32" />
            </Grid.RowDefinitions>

            <Grid.ColumnDefinitions>
                <ColumnDefinition Width="Auto" />
                <ColumnDefinition Width="*" />
            </Grid.ColumnDefinitions>

            <!--Kind-->
            <TextBlock Grid.Row="0"
                   Grid.Column="0"
                   VerticalAlignment="Center"
                   Text="Kind" />
            <TextBox
                 Grid.Row="0"
                 Grid.Column="1"
                 Margin="5,0,0,0"
                 VerticalAlignment="Center"
                 Text="{Binding Path=Model.Kind, Mode=TwoWay, UpdateSourceTrigger=PropertyChanged}">
            </TextBox>

            <!--Price-->
            <TextBlock Grid.Row="1"
                   Grid.Column="0"
                   VerticalAlignment="Center"
                   Text="Price" />
            <TextBox
                 Grid.Row="1"
                 Grid.Column="1"
                 Margin="5,0,0,0"
                 VerticalAlignment="Center"
                 Text="{Binding Path=Model.Price, Mode=TwoWay, UpdateSourceTrigger=PropertyChanged, ValidatesOnDataErrors=True, ValidatesOnNotifyDataErrors=True}">
            </TextBox>

            <!--Quantity-->
            <TextBlock Grid.Row="2"
                   Grid.Column="0"
                   VerticalAlignment="Center"
                   Text="Quantity" />
            <TextBox
                 Grid.Row="2"
                 Grid.Column="1"
                 Margin="5,0,0,0"
                 VerticalAlignment="Center"
                 Text="{Binding Path=Model.Quantity, Mode=TwoWay, UpdateSourceTrigger=PropertyChanged}">
            </TextBox>

            <!--TotalCost-->
            <TextBlock Grid.Row="3"
                   Grid.Column="0"
                   VerticalAlignment="Center"
                   Text="Total Cost" />
            <TextBox Grid.Row="3"
                 Grid.Column="1"
                 Margin="5,0,0,0"
                 VerticalAlignment="Center"
                 Focusable="False"
                 IsReadOnly="True"
                 Text="{Binding Path=Model.TotalCost, Mode=OneWay}" />

            <!--Error Info-->
            <TextBlock
                   Grid.Row="4"
                   Grid.Column="1"
                   VerticalAlignment="Center"
                   Foreground="Red"
                   Text="{Binding Path=Model.Error, Mode=OneWay}" />
        </Grid>
        <Grid Grid.Row="2" Grid.Column="0" Grid.ColumnSpan="2">
            <Grid.ColumnDefinitions>
                <ColumnDefinition Width="Auto" />
                <ColumnDefinition Width="Auto" />
                <ColumnDefinition Width="Auto" />
                <ColumnDefinition Width="Auto" />
                <ColumnDefinition Width="*" />
            </Grid.ColumnDefinitions>

            <Button Grid.Column="0"
                    Content="Save"
                    Width="100"
                    Height="24"
                    Command="{Binding ApplyCommand, Mode=OneWay}"
                    Margin="5,0,0,0"
                    VerticalAlignment="Center">
            </Button>

            <Button Grid.Column="1"
                    Margin="5,0,0,0"
                    Content="Cancel"
                    Command="{Binding CancelChangesCommand, Mode=OneWay}"
                    Width="100"
                    Height="24"
                    VerticalAlignment="Center">
            </Button>

            <Button Grid.Column="2"
                    Margin="5,0,0,0"
                    Content="Undo"
                    Command="{Binding UndoCommand, Mode=OneWay}"
                    Width="100"
                    Height="24"
                    VerticalAlignment="Center">
            </Button>

            <Button Grid.Column="3"
                    Margin="5,0,0,0"
                    Content="Redo"
                    Command="{Binding RedoCommand, Mode=OneWay}"
                    Width="100"
                    Height="24"
                    VerticalAlignment="Center">
            </Button>
        </Grid>
    </Grid>
</Window>
That’s it. Let’s build the solution and see what we have:
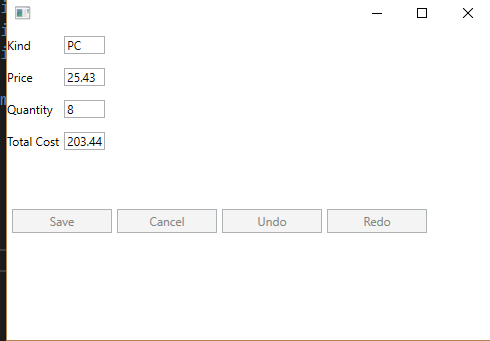
Pay attention that editing values will enable/disable the correspondent buttons like in the most common editing scenarios. All this functionality is ready out of the box!
Editing item - validation
The last missing piece would be the validation and error messages. It’s pretty common to have client-side validation defined by the property metadata. In this case we will use attributes:
public class DoublePositiveValidation : ValidationAttribute
{
    protected override ValidationResult IsValid(object value, ValidationContext validationContext)
    {
        try
        {
            var number = (double)value;
            if (number < 0.0)
            {
                return new ValidationResult(ErrorMessage);
            }
        }
        catch (Exception)
        {
            return new ValidationResult("Number is invalid");
        }
        return ValidationResult.Success;
    }
}

public class NumberValidation : ValidationAttribute
{
    public NumberValidation()
    {
        Minimum = int.MinValue;
        Maximum = int.MaxValue;
    }

    public int Minimum { get; set; }

    public int Maximum { get; set; }

    protected override ValidationResult IsValid(object value, ValidationContext validationContext)
    {
        var number = (int)value;

        if (number < Minimum || number > Maximum)
        {
            return new ValidationResult(ErrorMessage);
        }

        return ValidationResult.Success;
    }
}

public class StringValidation : ValidationAttribute
{
    public StringValidation()
    {
        MaxLength = 256;
    }

    public int MaxLength { get; set; }
    public bool IsNulOrEmptyAllowed { get; set; }
    public bool IsAlphaNumeric { get; set; }

    protected override ValidationResult IsValid(object value, ValidationContext validationContext)
    {
        var str = value as string;

        var isValid = IsNulOrEmptyAllowed || !string.IsNullOrEmpty(str);
        if (!isValid)
        {
            return new ValidationResult(string.Format("{0} should not be empty.", validationContext.ObjectInstance));
        }

        if (str != null)
        {
            var length = str.Length;
            isValid = length <= MaxLength;
            if (!isValid)
            {
                return new ValidationResult(string.Format("Provided string is {0} chars length. Maximal length allowed is {1}.", length, MaxLength));
            }

            isValid = !IsAlphaNumeric || str.Replace("-", "").All(char.IsLetterOrDigit);
            if (!isValid)
            {
                return new ValidationResult("Only alphanumeric characters or '-' are allowed.");
            }
        }
        return ValidationResult.Success;
    }
}

internal sealed class WarehouseItem : AppModel, IWarehouseItem
{
    public WarehouseItem(
            string kind,
            double price,
            int quantity)
    {
        Id = Guid.NewGuid();
        _kind = kind;
        _price = price;
        _quantity = quantity;
    }

    private string _kind;
    [StringValidation(IsNulOrEmptyAllowed = false, MaxLength = 63)]
    public string Kind
    {
        get => _kind;
        set => SetProperty(ref _kind, value);
    }

    private double _price;
    [DoublePositiveValidation(ErrorMessage = "Price must be positive.")]
    public double Price
    {
        get => _price;
        set
        {
            SetProperty(ref _price, value);
            NotifyOfPropertyChange(() => TotalCost);
        }
    }

    private int _quantity;
    [NumberValidation(Minimum = 1, ErrorMessage = "Quantity must be positive.")]
    public int Quantity
    {
        get => _quantity;
        set
        {
            SetProperty(ref _quantity, value);
            NotifyOfPropertyChange(() => TotalCost);
        }
    }

    public double TotalCost => _quantity * _price;
}
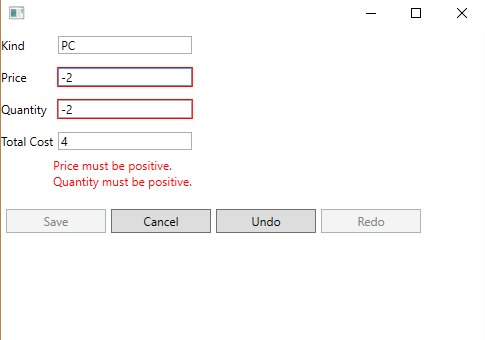
If you try to modify the values you should see the appropriate error message
and the buttons will be automatically disabled until you fix the value.
Summary
So far we have seen the power and simplicity of LogoFX with regard to item editing lifecycle
and the app bootstrapping. Stay tuned for more ;)